How to Photograph Shiny Objects Without Reflection

Read | Loved by: 66319
Making of a shiny product photography takes a lot of work. But it becomes easier if you know how to set the lights for the shoot. Proper light placement softens the light on the product’s surface and stops it from bouncing back. Some photographers choose gigantic lights to avoid creating a direct reflection. Some might keep it for clone and patch tools in photo editing. But the best quality photo gets ultimate smoothness after retouching. So, why not go for the purely flawless photo? So, here is how to photograph shiny objects like a pro! But before that, let’s look at how reflection hampers highly reflective product photography.
How Reflection Affects Smooth Surface Photography
We see the moon because the sunlight falls on it, and the moon reflects the light back to our eyes. We know that matrix well that we see any object only when light falls on it and it reflects back. But when the thing itself is shiny, it reflects everything around like a mirror as light falls on it. It is called direct reflection. So when we photograph the polished products, it catches all the reflection from the surroundings. The result? A bad-quality image. These reflections are terrible to tackle, even in post-processing.
Now, if the object is matte, it does not manipulate the light with high reflection. The reflection becomes diffused. So the mission is to make your product look matte! How? By positioning and diffusing light to manage reflection.
(P.S if you want to learn more about reflection,you can read this book Light,Science & Magic)
How to Photograph Shiny Objects without Reflection
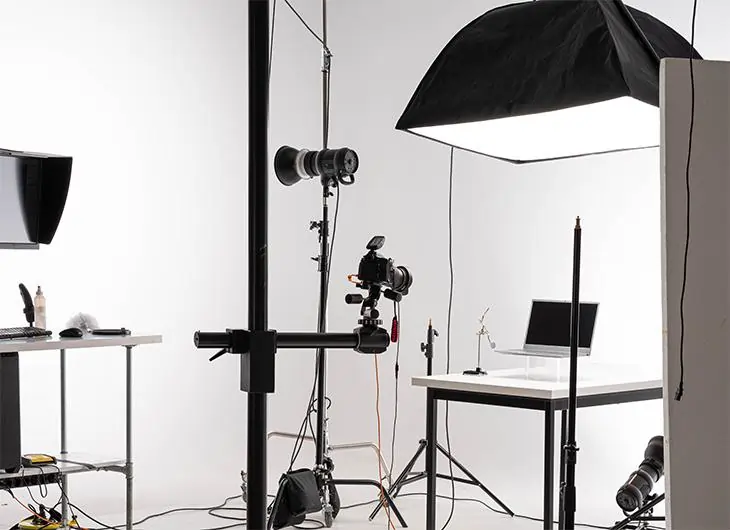
To click a highly reflective product, set it on a tabletop at the best angle. Place a big light behind the product and opposite the camera. Diffuse light with a bounce card, a tent or a lightcone. Set the camera with the lowest ISO, faster shutter speed, narrow aperture, and shallow depth of field.
I am writing below my two cents on photographing highly reflective products with a smooth texture!
1. Place the light behind the object to prevent reflection
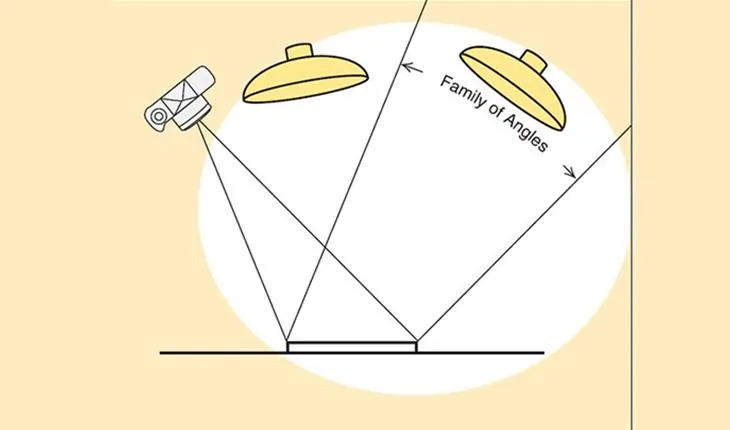
The placement of light, camera, and product determines the emergence of reflection. If the light falls in the family of angles, then it will create direct reflection. The Family of Angle is vital to understand how light works and to set the lights and camera. It is explained well in the book Light—Science & Magic.
This family of angles is a bit difficult to understand, but I will try to make it easier.
When the light is just in front of the product and falls on it, it is called the incident light. And when the light from the object bounces back towards the camera lens, that is reflected light.
If you place the light in front of the product, the light will create a reflection as soon as it falls on the shiny surface. Then the reflection from the product will bounce back to the camera as you click. It will capture the reflection from the surroundings on the product.
The space where the light falls on the object and the object reflects it directly to the camera is the family of angles.
So, placing light in front will cause the family of angles or, to say, a direct reflection. On the other hand, if we place the light out of the family of angles or where direct reflection happens, the light will not bounce, and there will be no glare.
Long story short, place the light behind, above, or below the product and opposite the camera to take a picture without reflection!
2. Use a big light source to avoid direct reflection
A big light makes the shadow mild and shields the entire thing. Getting covered by one light, no reflection will bounce back. To be more specific, a big light covers up the family of angles, where direct reflection could happen. So use a larger light that covers up the entire object & there will be no reflection!
3. Reposition the product to diffuse reflection
Repositioning the product against the light source can bring a significant change. Moving the product sometimes lets the light stay on the object, not bouncing to the camera. Particularly jewelry, cutlery, or any flat products can be tilted or repositioned to avoid catching the direct reflection. You can use museum putty and props to elevate the product and make angles.

4. Diffuse light with a light cone to avoid reflection in shiny object
If you are still bothered by the light reflection, use the tenting technique used in advertisement photography. For example, tents, flags, bouncing cards, or one of the best light diffusers to date- A Karl Taylor light cone!
Light cones created by Karl Taylor, a professional photographer, make product photographing easier. It especially handles direct reflection magically. Light Cones surround a product 360 degrees that cover the entire thing. The cones then diffuse the light so perfectly that it can satisfy you instantly. The cones are made of rigid polypropylene, and they are heatproof.
Place your product on a tabletop, choose the size of the cone you need as per the product size. Now assemble the cone and drop it around the product. Now place the camera or mobile lens over the cone hole, click, and voila! Your perfect photo is done. You can use the light of your choice because, apparently, the cone will diffuse the light. so create a dramatic atmosphere to your heart's content. You can make your own lightcone or tent with paper as well!
Apart from a light cone or tent, you can also use bounce cards or flags to diffuse or cut the light.
5. Camera Setting for reflective product shots
It's common that we keep our camera in a manual mood for product images. But what camera setting helps to make a smooth photo of a shiny product? Let’s see!
It is better to put ISO at the base level to take a picture of a mirrored object. Low ISO will prevent noise from masking the details of the close-up shot. A wide ‘f stop’ or small aperture is the holy grail for photographing small, glossy products. And for low ISO and narrow aperture, you will require a slow shutter speed. A tripod must be used to avoid camera shake for this slow shutter speed. For better focus and sharpness, you can also use a camera timer. Finally, don’t forget to turn off your camera flash since it will create glare.
Coda
Luminous objects are challenging to photograph, but they sure let you play with light. Jokes apart! Even if you feel like the light is playing with you, just weaken the light.
Well, I love to share my thoughts on making of a shiny product photography. But, rest we know, we all have our back with photo retouching photo retouching services like ColorClipping. So, no worries, and keep snapping!
FAQ

Faria Ahammed Juthi
Hi, it's Faria, Content Executive from Color Clipping Ltd with a passion to contribute knowledge sharing more simply. Keep learning and growing with us.
