How to Use Lasso Tool in Photoshop | Tutorial of Lasso Tool

Read | Loved by: 39180

The Lasso Tool is a tool in Adobe Photoshop which is used to select or draw the borders of an object of an image. You will find the Lasso Tool in both Photoshop and Illustrator. But today we will only focus on the Lasso Tool in Photoshop. We will learn how to use Lasso Tool in Photoshop. Lasso Tool can define edges very sharply. Since Lasso Tool allows you to select an object manually, you can select it as precious as you want.
The question may arise, why do we need the Lasso Tool? The answer is, for many reasons. The most common reason is for background removal. Suppose you clicked an image of a beautiful flying bird on your phone. And you want to post it online for probably likes and reacts. But soon you notice the sky is looking very dull, there is a blurry flying plain or an object randomly comes into the picture. Are you going to throw the picture or post it as it is?
None. You should remove the background and make it as smooth as possible. You went online and searched for websites that will remove your background in seconds with AI technology. You gave it a try. But that didn’t give you a smooth and flawless finish. What to do now? Do it manually, with the help of Photoshop. Don’t know how to use it? Come on, you have already clicked on this blog after reading the title. So, let’s learn how to use the Lasso Tool in Photoshop.
In short, it allows you to draw free-hand selection, which brings accuracy to your control. It is also believed that clipping is the first step of Photoshop. After clipping, your doors will be open for new and good projects to come.
Types of Lasso Tool
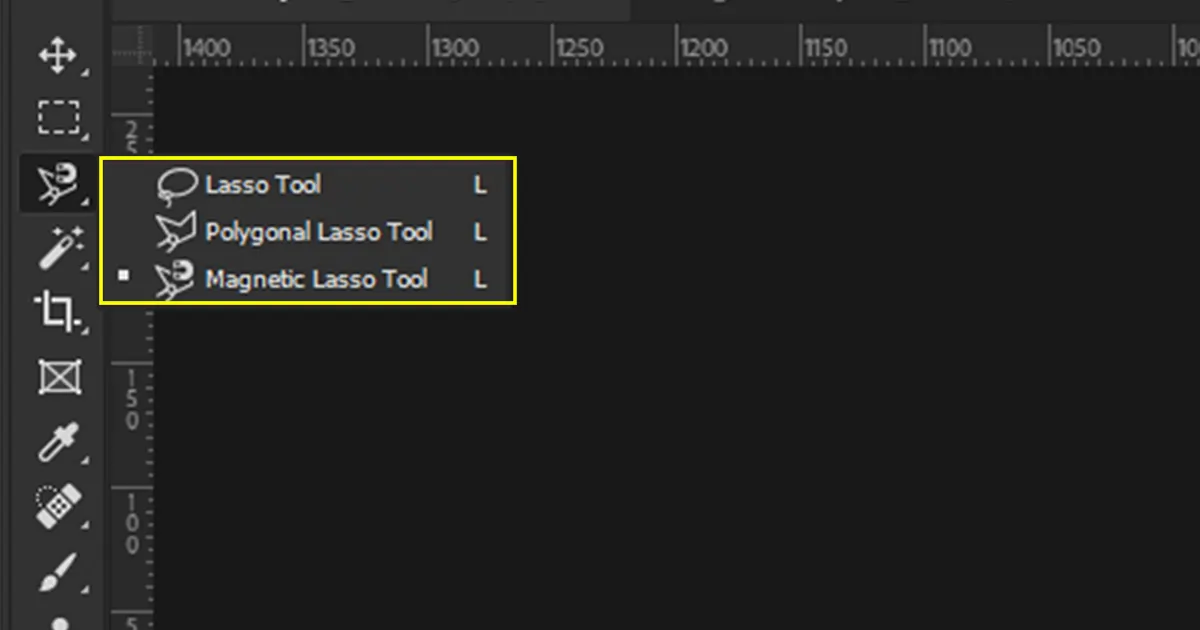
We all know, Photoshop is considered as the best software for photo editing. In Photoshop there are three types of Lasso tools to use. They will give you the same output but the methods of using the tools are different, which depends on the object of what you are selecting with the help of the Lasso Tool in general. Of course, you will find your own preference and comfort while working and will find out which is comfortable for you to use in which image. The Lasso Tools are…
1. The Lasso Tool
2. The Polygonal Lasso Tool and
3. The Magnetic Lasso Tool

How to use Lasso Tools In Photoshop
By looking at the final result you might not know which tool has been used for which part but the work process of the tools are different. Let’s dig into details to know more about their work abilities…
The Lasso Tool
Let’s start with the basics, the Lasso Tool.
Lasso works as a free-hand tool. Suppose you want a cut-out of an object from an image by using the lasso tool.

Then follow the following steps…
- Open the image in the photoshop
- Select the Lasso Tool. (You will find the Lasso Tool on the left toolbar. The third icon is of the Lasso Tool. From those three options choose Lasso Tool)
- After selecting the Lasso Tool, go to the edges of the object you want to trace.
- Click at any point on the edge of the object, and move the mouse while still holding the right button of the mouse and out tracing the object.
- If everything comes ok you can stop here. But if not then go to the “add selection”, (you will find the “add selection” option on the top toolbar).
- Click on the part where you think you need the correction. It has to be inside the selected portion and then you can drag it out. But you have to release the right button of the mouse, after bringing the cursor back inside the selected portion.
It’s like expanding a portion of the selected part. And there you have it. Your desired object’s cut out.
If you have great mouse control over your hand then this might work well for you. Also, if you are working on a graphics tablet then this tool might work great for you.
The Polygonal Lasso Tool
Polygonal Lasso Tool is also a Lasso Tool similar to the previous Lasso Tool that we have discussed. The Polygonal Lasso Tool works in straight lines. It also works free-handed.

Let’s learn how it works…
- Open the Image in Adobe Photoshop and select the Polygonal Lasso tool from the Lasso Tool Option.
- Click on the edges of the object that you want to out trace.
- In the previous Lasso Tool, you had to click and drag while holding the right button of the mouse. But here in the Polygonal Lasso Tool, you have to drag and click. You will see a straight line appearing on the cursor point after clicking on a point.
- Then move the mouse and click on the points you want to curve and continue the process. Try to do it with small portions in a picture. To get the precision on the object.
- Like the previous Lasso Tool you had to connect the edges to get the object out traced, do the same for the Polygonal Lasso Tool.
It is great to use the polygonal Lasso Tool when your object is in straight lines like Buildings.
Note: In the Polygonal Lasso Tool, if you make any mistakes just press “backspace” to undo the work.
The Magnetic Lasso Tool
Magnetic Lasso Tool works like a magnet as it is named. It works on the sharp edges and works better in clear color contrast.

So, let’s see how it works…
- Open the image in Adobe Photoshop
- Start by clicking at any point on the edge of the object.
- Move your mouse near the edges of the object. It will select the points and curves automatically.
- Connect the edges from where you’re tracing.
But, in the Magnetic Lasso Tool, you cannot undo any moves. Instead, you have to choose the Polygonal lasso tool and select “add selection” to correct the mistakes or adjust any portions of it. You can also make some changes with the help of the Lasso Tool.
Conclusion
Lasso Tools are believed to be the most used tool after the pen tool. It is used for various purposes. Even though there are three types of Lasso Tools, The Lasso Tool, The Polygonal Lasso Tool, and the Magnetic Lasso Tool, the “selection tool” also plays a big role in this game. To add any portion after tracing the object or also to remove any portion of the image.
FAQ

Anika Wahab
Hello, it's Anika, Content Executive from Color Clipping Ltd with a devotion to contributing my skills and knowledge more simply. Keep learning and growing with us.
Categories
Tag Cloud
Latest Stories


